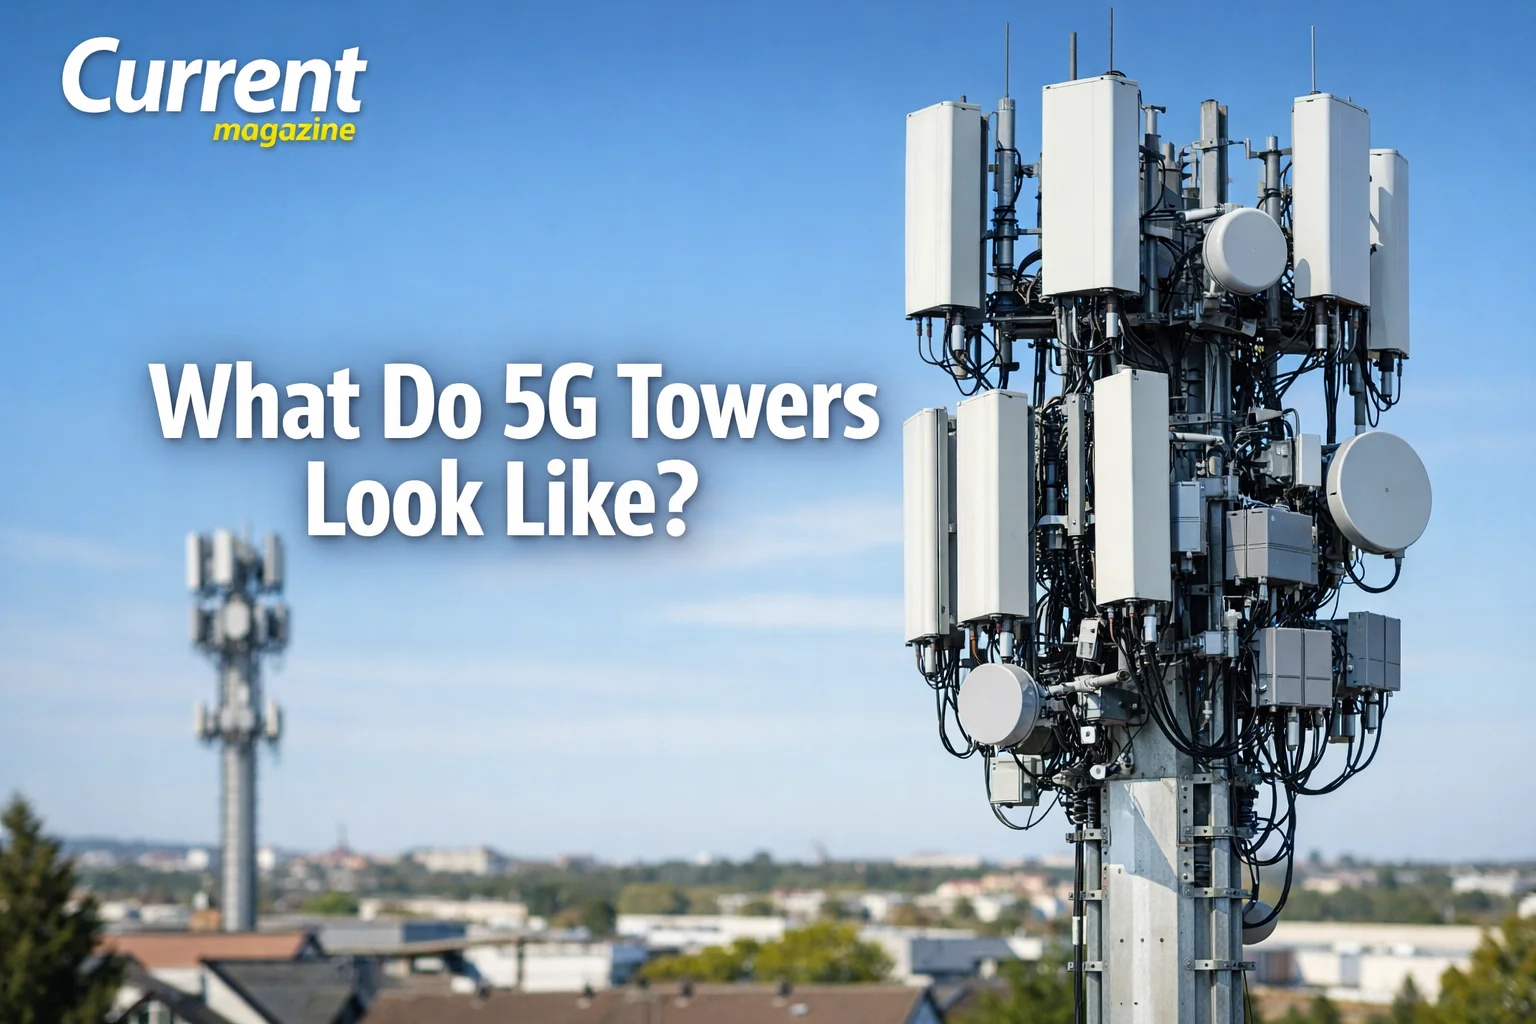
What do 5G towers look like? This question has sparked curiosity and confusion as 5G networks expand across cities and neighborhoods worldwide. 5G towers and equipment look quite different from traditional cell towers, often appearing as small boxes mounted on utility poles, building rooftops, or streetlights rather than the massive standalone structures many people associate with cellular networks. Understanding what 5G infrastructure actually looks like helps you identify it in your community and separate facts from misconceptions about this next-generation wireless technology.
Understanding 5G Infrastructure Basics
Before diving into what 5G towers look like, it’s important to understand that “5G tower” is somewhat of a misleading term. The 5G network relies on a combination of different equipment types, not just traditional towers. The infrastructure includes macro towers, small cells, and distributed antenna systems, each serving different purposes in delivering fast, reliable 5G coverage.
Traditional Macro Towers with 5G Equipment
The most recognizable form of 5G infrastructure involves upgrading existing cell towers. These macro towers are the tall structures you’ve seen for years, typically ranging from 50 to 200 feet high. When carriers add 5G capability to these towers, they install new equipment alongside existing 4G hardware.
What the towers look like: These structures remain largely the same as before. They might be lattice towers (resembling large metal frameworks), monopole towers (single, thick poles), or disguised structures that look like trees, flagpoles, or church steeples in areas with aesthetic concerns.
The 5G equipment on these towers: Look for rectangular panel antennas that are typically larger than older equipment. These panels are often white or gray and mounted in arrays facing different directions to provide coverage in multiple zones. You might see multiple rows of these panels, sometimes with distinctive groupings of three or four panels clustered together.
Additional features: Alongside the antennas, you’ll notice various cabinets and boxes containing radio equipment, fiber connections, and power supplies. Some of this equipment sits at the base of the tower in weatherproof enclosures, while other components mount directly on the tower structure.
Small Cell 5G Installations
This is where 5G infrastructure truly differs from previous generations. Small cells are the compact, distributed equipment that makes 5G’s high-speed promises possible, especially in urban areas.
Appearance and size: Small cells are relatively compact units, typically the size of a backpack or small suitcase. They measure roughly 1 to 2 feet tall and about 10 to 15 inches wide. These units are much less obtrusive than traditional cell towers.
Common mounting locations: You’ll find small cells mounted on existing utility poles, streetlight poles, traffic lights, and building exteriors. They’re designed to blend into urban landscapes, though they’re visible once you know what to look for.
Color and design: Most small cells are painted neutral colors like gray, white, black, or beige to match their surroundings. Some are housed in sleek, cylindrical enclosures, while others look like rectangular boxes with antennas protruding from them.
Mounting hardware: The equipment attaches to poles using metal brackets and bands. You’ll often see cables running from the small cell down the pole to ground-level equipment cabinets or underground connections.
Streetlight and Utility Pole Installations
One of the most common 5G deployments involves integrating equipment into existing street furniture, making the technology almost invisible to casual observers.
Integrated designs: Modern 5G small cells often integrate directly into streetlight housings. The equipment might be contained within the light pole itself, with only subtle bulges or attachments revealing its presence. Some installations include the antenna array at the top of the pole, disguised as part of the lighting fixture.
Pole-mounted boxes: On utility poles, you’ll see rectangular or cylindrical equipment boxes mounted 20 to 30 feet above ground. These boxes are typically accompanied by smaller antennas that might look like short cylinders or flat panels pointing in various directions.
Accompanying equipment: Look for additional small cabinets or boxes mounted lower on the pole, often around 6 to 10 feet high. These contain power supplies, backup batteries, and network equipment. Fiber optic cables connect these components, sometimes visible as thin cables running along the pole.
Building-Mounted 5G Equipment
Buildings, especially in dense urban areas, serve as excellent platforms for 5G equipment due to their height and strategic locations.
Rooftop installations: On building roofs, 5G equipment appears as clusters of panel antennas mounted on metal frames or platforms. These installations might include multiple antenna panels of various sizes, all connected to equipment cabinets sitting nearby on the roof surface.
Wall-mounted units: On building exteriors, 5G small cells mount flush against walls or extend slightly outward on brackets. They’re often placed near the roofline or at upper-story levels to maximize coverage. The equipment typically looks like flat panels or boxes, sometimes with small antennas extending from them.
Aesthetic considerations: In historic districts or areas with strict appearance standards, 5G equipment may be housed in decorative shrouds that match the building’s architecture. These enclosures might resemble architectural features, making the technology nearly invisible.
5G mmWave Equipment
The highest-speed 5G service uses millimeter wave (mmWave) technology, which requires specific, distinctive-looking equipment.
Compact appearance: mmWave antennas are typically smaller than other 5G equipment, often looking like small panels or rectangles measuring just a few inches across. Despite their small size, they’re usually grouped in arrays of multiple units.
Dense deployment: Because mmWave signals don’t travel far, you’ll see this equipment deployed very densely in urban areas where it’s used. Installations might be only a block or two apart.
Placement characteristics: mmWave equipment often mounts lower than other 5G infrastructure, sometimes just 15 to 25 feet above ground. You’ll find it on storefront awnings, bus stops, and street furniture in areas with heavy pedestrian traffic.
Distinguishing 5G from 4G Equipment
Many people wonder how to tell if they’re looking at 5G or older 4G/LTE equipment. Here are some clues:
Size and configuration: 5G antennas, particularly for mid-band and high-band frequencies, are often larger and more numerous than 4G antennas on the same structure. You might see a noticeable increase in the amount of equipment on towers that have been upgraded.
Modern appearance: 5G equipment tends to look newer and cleaner, with sleeker designs and contemporary mounting hardware. The equipment is often white or light gray with modern, streamlined enclosures.
Small cell presence: If you see small, distributed equipment on streetlights and utility poles throughout a neighborhood, it’s likely 5G infrastructure. While some 4G small cells exist, the technology’s widespread use of this deployment method is characteristic of 5G.
Panel groupings: 5G installations often feature distinctive groupings of antennas in sets of three or four panels closely spaced together. This configuration, particularly at similar heights on a tower, suggests 5G massive MIMO (Multiple Input Multiple Output) technology.
Geographic Variations in 5G Tower Appearance
The appearance of 5G infrastructure varies significantly based on location and local regulations.
Urban areas: Cities feature predominantly small cells on existing infrastructure. You’ll see equipment on nearly every other block in downtown areas, mounted on streetlights, utility poles, and buildings. The equipment tends to be more compact and designed to blend in.
Suburban regions: Suburbs typically use a combination of upgraded macro towers and strategic small cell deployments. The equipment might be more spread out, with traditional towers providing broad coverage and small cells filling in gaps.
Rural locations: Rural 5G currently relies mainly on upgraded macro towers using low-band frequencies. These installations look similar to existing cell towers but with new antenna panels added to the structure.
Different countries: 5G equipment appearance varies internationally based on local design standards, regulatory requirements, and aesthetic preferences. European installations often emphasize blending with historic architecture, while deployment styles in Asian cities might prioritize density and coverage over appearance.
Camouflaged and Disguised 5G Installations
Many communities require carriers to disguise cell equipment to maintain neighborhood aesthetics.
Tree disguises: “Mono-pines” and “mono-palms” are artificial trees that conceal cell equipment. With 5G upgrades, these structures now hide modern antennas within artificial branches and foliage. From a distance, they blend with natural surroundings, though up close, the disguise becomes apparent.
Architectural integration: In some areas, 5G equipment hides behind false chimneys, within church steeple additions, or integrated into decorative building features. These installations can be nearly impossible to identify without close inspection.
Decorative shrouds: Standalone 5G small cells sometimes feature decorative covers that make them resemble lanterns, architectural ornaments, or modern art installations rather than telecommunications equipment.
Safety Features and Signage
5G installations include various safety features and identification markers worth noting.
Warning signs: Equipment typically displays small signs indicating the presence of radio frequency emissions and warning maintenance workers about potential hazards. These signs often include FCC registration numbers and carrier information.
Fencing and barriers: Ground-level equipment cabinets usually sit within small fenced enclosures to prevent tampering. These fences might be simple metal barriers or more decorative options depending on location.
Lighting: Some installations include small indicator lights that blink to show the equipment is operational. These lights are typically subtle and don’t create significant light pollution.
Identification markings: Most 5G equipment bears manufacturer logos, model numbers, and unique identification codes, though these are often small and difficult to read from ground level.
Future Changes in 5G Tower Appearance
As 5G technology evolves, the appearance of infrastructure will continue changing.
Smaller equipment: Technological advances are making 5G equipment more compact. Future installations will likely be even less noticeable than current designs.
Better integration: Manufacturers are developing equipment that integrates more seamlessly into existing structures, including smart city infrastructure like intelligent streetlights and traffic systems.
Increased standardization: As 5G matures, equipment designs are becoming more standardized, leading to more consistent appearance across different carriers and locations.
Common Misconceptions About 5G Tower Appearance
Several myths about 5G infrastructure appearance circulate online. Let’s clarify:
Misconception: All 5G uses massive towers: Reality shows that much 5G infrastructure consists of small, distributed equipment rather than large towers.
Misconception: 5G towers are distinctly different: In many cases, 5G equipment is added to existing towers, making them look similar to previous generations with some additional antennas.
Misconception: 5G equipment always looks high-tech: Many installations deliberately blend with surroundings and look quite ordinary to minimize visual impact.
How to Identify 5G Infrastructure in Your Area
If you’re curious about 5G deployment near you, here’s how to spot it:
Look up, not just around: Most 5G equipment sits elevated on poles, buildings, and towers. Scan the upper portions of structures rather than just at eye level.
Check streetlights and utility poles: Walk or drive through your neighborhood specifically looking at the tops of poles for mounted equipment.
Use carrier maps: Most cellular providers offer online maps showing 5G coverage areas. These can guide you to locations with 5G infrastructure.
Watch for construction: New installations require equipment mounting and cable running. Construction activity on poles or towers often indicates 5G upgrades.
10 FAQs About 5G Tower Appearance
1. How can I tell if a cell tower is 5G or 4G? Look for newer, larger panel antennas often grouped in sets of three or four, modern white or gray equipment, and recent installation dates. However, many towers support both 4G and 5G simultaneously, so the presence of both technologies together is common. Small cells on streetlights and utility poles throughout neighborhoods are typically 5G.
2. Are 5G towers taller than 4G towers? No, 5G towers aren’t necessarily taller than 4G towers. In fact, much 5G infrastructure uses existing tower heights or deploys on shorter structures like utility poles and streetlights. The technology relies more on density of installations rather than tower height.
3. Why are there so many more 5G installations than previous cell towers? 5G, particularly high-band 5G, uses radio waves that don’t travel as far as 4G signals. This requires many more small installations placed closer together to provide consistent coverage. Think of it as needing more small lamps to light a room instead of one big spotlight.
4. Do 5G towers look different from different cell phone carriers? Generally, 5G equipment looks similar across carriers (Verizon, AT&T, T-Mobile) because they use similar technology from the same manufacturers. However, deployment strategies differ, so you might see variations in mounting styles and equipment placement between carriers.
5. Can I have 5G equipment removed from near my home? This is difficult as carriers have legal rights to deploy infrastructure on utility poles, public rights-of-way, and qualifying private property. However, local zoning boards sometimes have input on placement decisions. Federal regulations generally limit how much local authorities can restrict wireless infrastructure.
6. What are the small boxes on streetlights in my neighborhood? These are most likely 5G small cells, which provide localized wireless coverage. They contain radio equipment, antennas, and network connections. Many cities have approved these installations on public streetlights to expand 5G coverage.
7. How far apart are 5G towers typically placed? This varies greatly by technology type and environment. Traditional macro towers might be 1-2 miles apart in urban areas. Mid-band 5G small cells typically deploy every few blocks. High-frequency mmWave installations might be only 500-1000 feet apart in dense urban areas.
8. Do 5G towers need to be connected by cables? Yes, nearly all 5G installations require fiber optic cable connections to the broader network. This is why you often see construction crews running new fiber cables when deploying 5G infrastructure. Wireless backhaul exists but is less common for primary connections.
9. Why do some 5G installations look like trees or other objects? Local regulations, especially in residential or historic areas, often require carriers to disguise cell equipment to minimize visual impact. These “stealth” installations help maintain neighborhood aesthetics while providing necessary wireless coverage.
10. Are the antennas on 5G towers dangerous to be near? According to extensive research by health organizations including the FDA, FCC, and WHO, 5G equipment operating within regulatory limits poses no health risks. The radio frequency energy decreases rapidly with distance, and public areas maintain safe separation distances. All installations must comply with strict federal safety standards.